📘 TTK ePay Module
TTK ePay is a powerful and flexible electronic payment module developed as part of the Deploily web application. Designed to streamline the online payment experience, it empowers users to send payment links directly to their clients and provides a secure, user-friendly interface for completing transactions. Built on an MVC architecture, TTK ePay enables users to manage and track client payments efficiently through its intuitive Admin Console. Users can create, update, and monitor invoices via a centralized dashboard, ensuring complete control over payment operations. TTK ePay also includes a robust RESTful API, allowing developers to integrate the module into their own applications and customize the payment experience to fit their specific business needs. Payments through TTK ePay are securely processed via Edahabia and bank cards, providing flexibility and trust for both users and clients.

🧭 TTK ePay – Full Workflow
📈 BPMN Diagram
PHASE 1️⃣: Development Testing
This phase is done in a safe environment using the SATIM Emulator. It allows you to test your integration and confirm that everything works correctly before moving to pre-production.
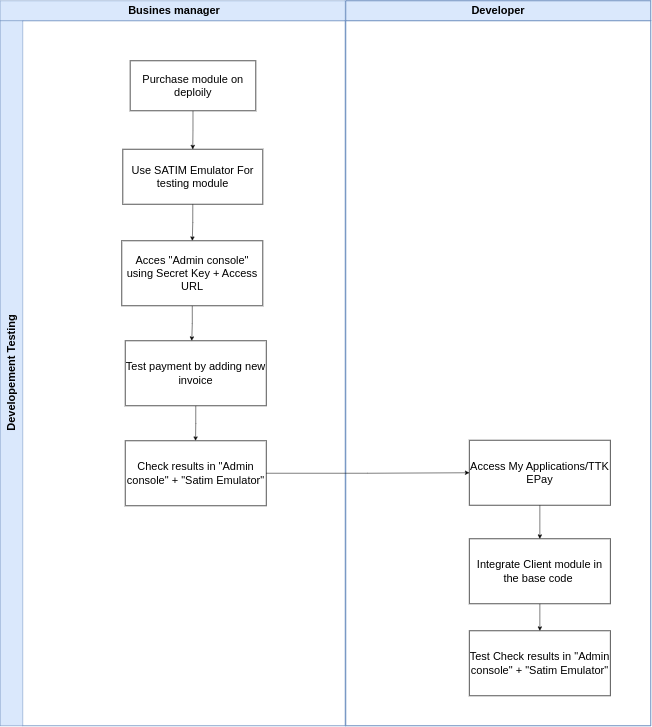
1️⃣ Order TTK ePay in Deploily
- Log into your Deploily account
- Go to Applications > TTK ePay
- Purchase the module
- You will receive:
- API Base URL
- Secret Key (used for Admin Console access)
2️⃣ Configure and Test with SATIM Emulator
- Read the User Documentation (guidelines)
- Fill in brand elements:(Name,Website,Address,Logo,Phone & Email,Privacy Policy URL & Terms URL)
- Select "SATIM Emulator" as the SATIM URL
- Copy Username + Password + Terminal ID from Emulator and enter them into Deploily UI
- Access Admin Console using Secret Key and Access URL
- Create a new test invoice
- Copy Client Code + Invoice Number
- Open Access URL → Fill test data → Redirect to Payment Page → Check Result (Success or Fail)
- Alternatively, generate a Payment Link, paste in the browser, and follow the same flow
- Check payment results in Admin Console and SATIM Emulator to ensure everything works
3️⃣ Integrate TTK ePay Module into Your Code
- Read the SATIM technical requirements:
- - Checkout Page
- - Success Page
- - Failure Page
- Integrate the Client Module into your base code (Node.js / Python supported)
- Add your Secret Key securely (as an environment variable)
- Test the API using SATIM Emulator
- Verify results in Admin Console and SATIM Emulator
✅ End of Phase 1: Once all tests succeed with the SATIM Emulator, you can proceed to Phase 2: SATIM Engagement (Pre-Production Testing).
PHASE 2️⃣: Pre-Production Testing
This phase ensures your payment module is certified by SATIM and fully compliant before moving to production. You will collaborate with cibweb.dz, your bank, and SATIM to validate your integration.
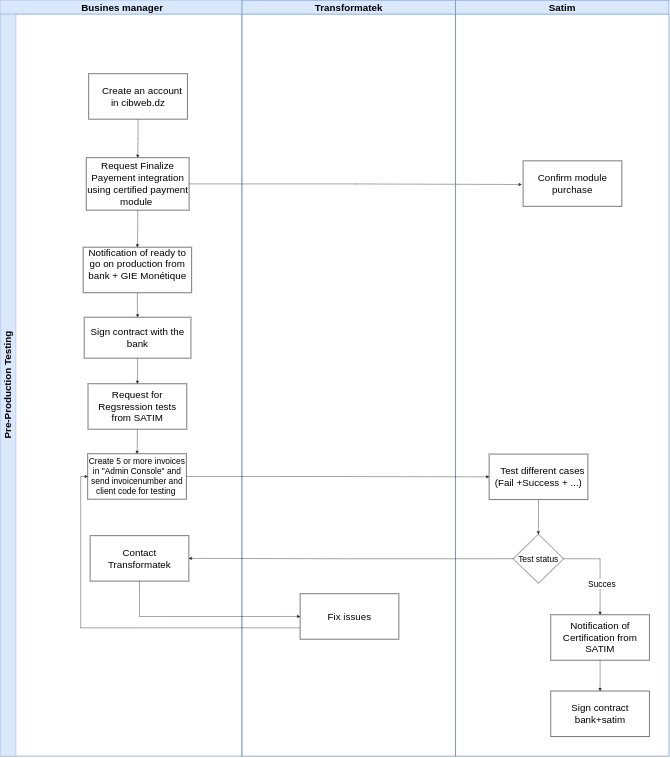
1️⃣ Start Your SATIM Pre-Production Engagement
- Create an account on cibweb.dz
- Request Finalization of Payment Integration using the certified payment module (Module ID:
NC/07/000197/2021) - Transformatek will confirm the module purchase
2️⃣ Bank & GIE Monétique Validation
- Receive a Notification of readiness from your bank and GIE Monétique
- Sign the contract with your bank
3️⃣ Switch to SATIM Test Environment
- In Deploily, switch environment from SATIM Emulator → SATIM TEST
- Enter the test credentials (Username, Password, Terminal ID) into Deploily UI
- Click Request Update
4️⃣ Perform Pre-Production Testing
- In your Admin Console, create at least 5 invoices
- Send the Access URL with invoice numbers + client codes to SATIM for regression testing
5️⃣ SATIM Certification
- SATIM performs regression tests (Success, Fail, etc.)
- If issues occur, contact Transformatek for assistance
- Once validated, you will receive your official Certification from SATIM
- Sign the final contract with your bank and SATIM
✅ End of Phase 2: Your integration is now SATIM-certified and ready to move to Phase 3: Production.
PHASE 3️⃣: Production
This is the final phase where your system goes live with real payments. You will use SATIM Production credentials and perform real transactions to activate your service.
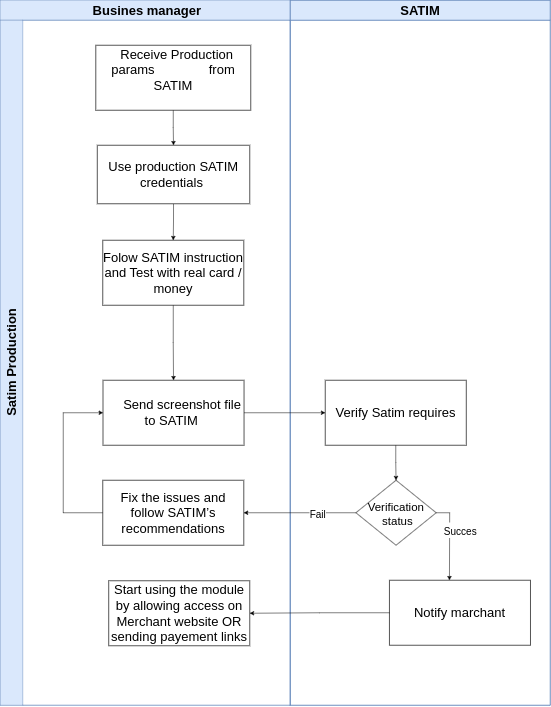
1️⃣ Receive Production Parameters
- Get your Production credentials (Username, Password, Terminal ID) from SATIM
2️⃣ Switch to SATIM Production Environment
- In Deploily, switch environment from SATIM TEST → SATIM PRODUCTION
- Enter the Production credentials into Deploily UI
- Click Request Update
3️⃣ Perform Live Testing
- Create at least 2 invoices in your Admin Console or directly from your platform process
- Use a real payment card to make test payments with actual money
- Follow SATIM’s testing instructions carefully
- Take screenshots of all payment results (Success, Fail, etc.)
4️⃣ Send Confirmation to SATIM
- Save all payment screenshots in a file
- Send the file to SATIM for validation and confirmation
5️⃣ Go Live
- Enable the payment module on your merchant website
- Or start sending payment links directly to your customers
- End-users can now make payments online securely
🎉 End of Phase 3: Your platform is now in Production and fully operational with live SATIM payments.
🧩 TTK ePay MVC
The MVC integration enables your users to make payments for their invoices directly through your web application's interface. This approach offers flexibility and a streamlined payment experience.
💳 How It Works
- The user accesses a payment page and provides their invoice number and client code.
- The system fetches and verifies the invoice details from your backend (or through the TTK ePay SDK).
- If the user chooses to proceed with payment via our module, a confirmation screen is displayed.
- Upon confirmation, the user is redirected to the SATIM secure payment interface.
- The user enters their bank card credentials and completes the transaction securely.
- After payment, the user is redirected back to your application with the result.
🔐 Security Notes
- Payment is handled securely through SATIM's official gateway.
- No card credentials are ever stored or transmitted by your system.
- You must validate the payment result through TTK ePay's backend confirmation route.
📦 Example Flow
- User navigates to
/payement-url - Enters invoice number and client code
- Clicks "Pay"
- Sees a confirmation modal
- Redirects to SATIM
- Completes payment
- Gets redirected back with status: success or failure
🌐 TTK ePay API
TTK ePay offers official SDKs for Node.js and Pythonto help developers easily integrate e-payment capabilities into their applications. Below is an overview of the available packages and usage examples.
📦 Node.js Client
Official npm package: @deploily/ttk-epay-nodejs-client
Installation
npm install @deploily/ttk-epay-nodejs-clientExample Usage
const { ttk_epay } = require('@deploily/ttk-epay-nodejs-client');

            const client = new ttk_epay({
              baseUrl: 'https://your-app.com',
              secretKey: 'your-secret-key'
            });

            // List invoices
            const invoices = await client.get_invoices(1, 10);
Available Methods
getInvoices(page, size)– Paginated invoice listingcreateInvoice(data)– Create a new invoicegetInvoiceById(invoiceId)– Fetch invoice via IDupdateInvoice(invoiceId, data)– Update an invoicegetPayments(options)– Filter and list paymentsgetPaymentById(paymentId)– Fetch payment via IDpostPayement(data)– Register a new paymentgetPdfRecipt(orderId)– Get a PDF receiptsendPdfReceiptMail(orderId, email)– Send receipt by email
🐍 Python Client
Official PyPi package: ttk-epay – GitHub source: ttk-epay-python-client
Installation
pip install ttk-epayExample Usage
from ttk_epay.client import TtkEpay

client = TtkEpay(
    base_url="https://your-app.com",
    secret_key="your-secret-key"
)

# List invoices
invoices = client.get_invoices(page=1, size=10)
Available Methods
get_invoices(page, size)create_invoice(data)get_invoice_by_order_id(order_id)update_invoice(invoice_id, data)get_payments(params)post_payement(data)get_pdf_recipt(order_id)send_pdf_recipt_mail(order_id, email)
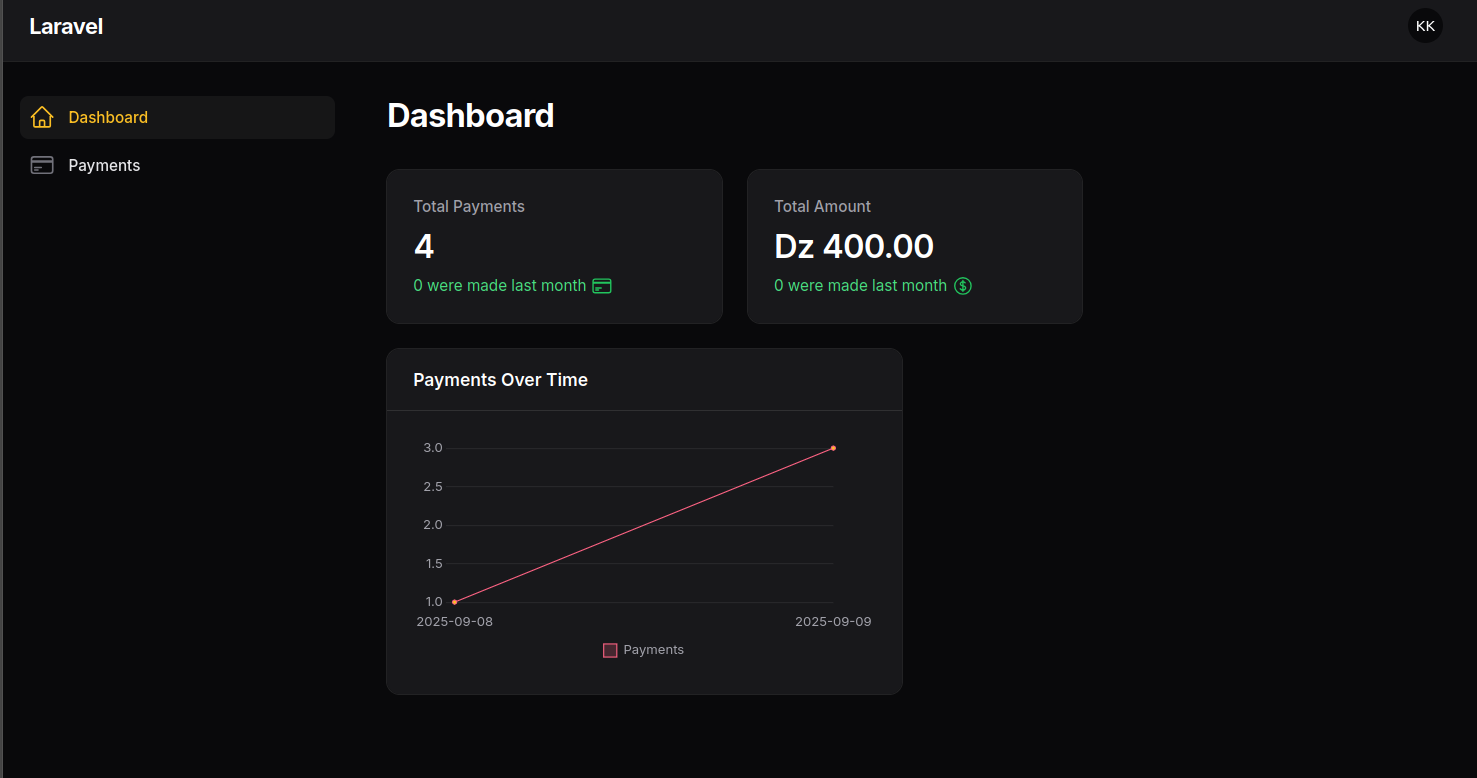
🖥️ TTK ePay Admin Console
The TTK ePay Admin Console is a secure and intuitive web dashboard that allows users to manage their payment operations, invoices, and receipts efficiently. Once you have purchased the module, you can access this interface to fully configure and monitor your e-payment system.
🔐 Registration
After purchasing the module, you'll receive a Base URL and a Secret Key. Use these credentials to register your service in the admin console.
- Access the registration form
- Enter your application URL
- Paste your secret key
- Submit to activate your integration

📄 Invoice Management
From the dashboard, users can view all invoices in a searchable, paginated table. You can:
- View all invoices
- Create new invoices
- Update existing invoices

💳 Payments Overview
The payments section provides a comprehensive view of all received payments. You can:
- Browse and filter all payment records
- View payment details including amount, date, status, and invoice linkage
- Download the full list of payments (CSV or Excel)
- Download individual receipts as PDFs

📥 Downloadable Documents
- Download receipts as PDFs
- Export full payment history as CSV
💳 TTK ePay Satim Emulator
📘 SATIM Emulator
The SATIM Emulator is a secure sandbox environment provided for developers and QA engineers to test online payment flows. It reproduces the behavior of the official SATIM gateway, but without involving any real transactions. This makes it safe and efficient for integration, testing, and troubleshooting.
Screenshot of the SATIM Emulator interface for testing payments.
🔄 Payment Workflow
- Register: Create an order via
/register.do - Redirect: User is redirected to the provided
formUrl - Confirm: Validate the order using
/confirmOrder.do - Result: Application handles
returnUrlorfailUrl
🔎 Why use the Emulator?
- Validate payment flows without using real money
- Obtain safe
satim_usernameandsatim_passwordfor tests - Simulate success and failure scenarios
- Verify your integration before going live
⚙️ How to Connect
- Login to your Admin Console
- Navigate to My Profile
- Copy the generated
satim_usernameandsatim_password - Use them inside your development/test environment
🚀 Usage in Tests
- Register a new test payment request
- Confirm the payment to simulate approval
- Trigger
failUrlto simulate rejection
📡 Example cURL — Register
curl -X GET "http://127.0.0.1:8000/api/payment/rest/register.do?orderNumber=123&amount=100¤cy=012&returnUrl=http://localhost/success&failUrl=http://localhost/fail&language=EN&userName=satim_demo&password=demoPass&description=TestPayment&jsonParams=%7B%7D" \ -H "Accept: application/json"
Example response:
{
  "orderId": 11,
  "formUrl": "http://127.0.0.1:8000/paymentWebpage?orderId=11",
  "errorMessage": "",
  "errorCode": ""
}
📡 Example cURL — Confirm
curl -X GET "http://127.0.0.1:8000/api/payment/rest/confirmOrder.do?language=EN&orderId=8&userName=satim_demo&password=demoPass" \
-H "Accept: application/json"
Example response:
{
  "orderStatus": 2,
  "errorCode": 0,
  "errorMessage": "",
  "actionCode": 0,
  "actionCodeDescription": "Payment already confirmed",
  "amount": 100,
  "currency": 10
}
✅ Best Practices
- Always test with multiple scenarios: success, failure, timeout
- Log all requests and responses during development
- Keep emulator and production credentials separate
- Automate regression tests using the emulator
❓ FAQ
- Q: My payments always fail.
A: Check if you’re using emulator credentials, not production ones. - Q: Redirect doesn’t work.
A: Ensure yourreturnUrlandfailUrlare accessible from your local/test environment. - Q: Can I use Postman?
A: Yes, you can run all endpoints from Postman or cURL.
⚠️ Notes
- No real banking transactions occur in the emulator
- Use only for development and QA phases
- Replace emulator credentials with real SATIM details before production